
Table of Contents
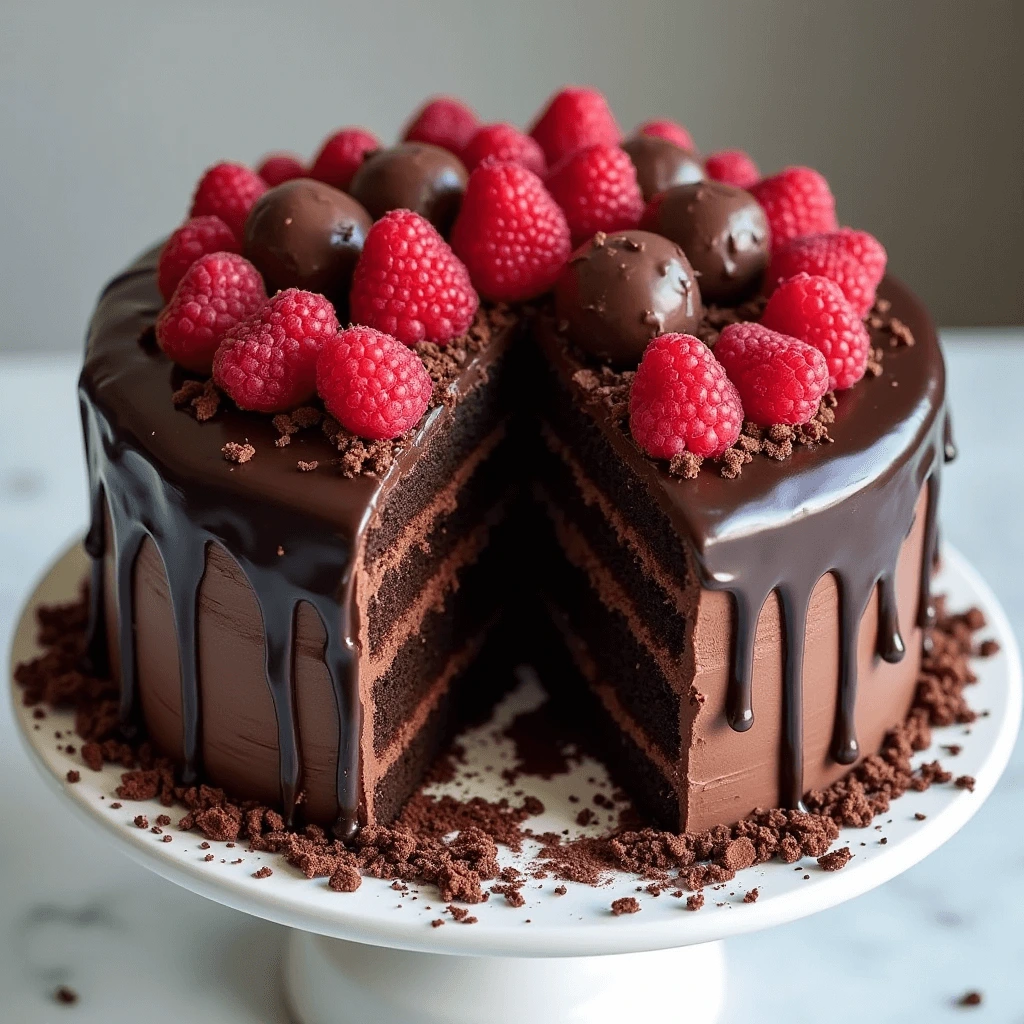
When it comes to decadent desserts, few creations can match the sheer indulgence of a Chocolate Ganache Cake. This luxurious treat is the epitome of elegance and sophistication, combining the richness of dark chocolate with the smooth, velvety texture of ganache. Whether you’re celebrating a special occasion or simply treating yourself to something extraordinary, a Chocolate Ganache Cake is sure to impress both visually and taste-wise.
Crafted with layers of moist, tender chocolate sponge, each slice offers a symphony of flavors that melt in your mouth. The glossy ganache coating, made from a blend of premium chocolate and heavy cream, adds a luscious finish that elevates the cake to new heights of deliciousness. Adorned with fresh raspberries and chocolate truffles, this cake is not only a feast for the palate but also a visual masterpiece.
In this blog post, we’ll delve into the art of making a perfect Chocolate Ganache Cake, sharing essential tips and techniques to ensure your cake is a showstopper. From choosing the right ingredients to mastering the ganache, we’ll cover everything you need to know to create a dessert that will leave everyone craving for more. So, let’s embark on this sweet journey and discover the secrets to baking the ultimate Chocolate Ganache Cake.
Choosing the Right Ingredients

High-Quality Dark Chocolate: The Key to Decadence
When it comes to creating a truly indulgent dessert, the quality of your chocolate matters. High-quality dark chocolate not only enhances the flavor of your cake but also contributes to its smooth texture and luxurious finish. Here’s why selecting the right dark chocolate is essential and how to choose the best one for your recipe.
Why High-Quality Dark Chocolate Matters
Dark chocolate is the heart of any chocolate-based dessert, and using premium varieties can make all the difference in taste and texture. High-quality dark chocolate has a higher cocoa content, fewer artificial additives, and a balanced bitterness that complements the sweetness of other ingredients. Here’s what it brings to your dessert:
- Rich, Intense Flavor: The higher the cocoa content, the deeper and more complex the chocolate taste. It creates a luxurious depth that pairs beautifully with creamy coconut filling.
- Smooth and Velvety Texture: Premium dark chocolate melts more evenly, ensuring a glossy and rich ganache or frosting.
- Health Benefits: Dark chocolate with a high percentage of cocoa (70% or more) is packed with antioxidants, flavonoids, and minerals, making it a healthier choice compared to milk chocolate.
How to Choose the Best Dark Chocolate for Baking
To get the best results in your chocolate coconut cake, consider the following factors when selecting dark chocolate:
- Cocoa Percentage – Aim for at least 60-70% cocoa for a well-balanced flavor that’s neither too bitter nor too sweet. If you prefer a more intense chocolate experience, opt for 80% or higher.
- Minimal Ingredients – High-quality dark chocolate should contain cocoa solids, cocoa butter, sugar, and sometimes lecithin or vanilla. Avoid chocolates with hydrogenated fats, artificial flavors, or excess additives.
- Brand Reputation – Opt for brands known for their premium chocolate quality, such as Valrhona, Callebaut, Ghirardelli, or Lindt. Artisan or bean-to-bar chocolates can also provide exceptional results.
- Melting Properties – For smooth ganache and frostings, choose couverture chocolate, which contains a higher percentage of cocoa butter, making it ideal for melting and glazing.
Using Dark Chocolate in Your Coconut Cake
To maximize the impact of dark chocolate in your cake, here are a few ways to incorporate it effectively:
- In the Cake Batter: Melted dark chocolate adds a deep, rich flavor to your cake, making it extra moist.
- As the Ganache Topping: A silky chocolate ganache made from high-quality dark chocolate and heavy cream gives the cake a beautiful glossy finish.
- For Garnishing: Finely grated or shaved chocolate on top enhances the visual appeal and adds a burst of extra chocolate flavor in every bite.
Fresh, Organic Raspberries: A Burst of Natural Sweetness
Incorporating fresh, organic raspberries into your chocolate coconut cake can elevate its flavor profile by adding a tangy contrast to the rich, decadent chocolate. These vibrant berries not only enhance the visual appeal of your dessert but also bring natural sweetness, juiciness, and a touch of tartness that perfectly balances the richness of dark chocolate and coconut. Here’s why fresh, organic raspberries are a must-have ingredient and how to use them effectively in your cake.
Why Choose Fresh, Organic Raspberries?
Raspberries are one of the most delicate and flavorful berries, but choosing organic varieties ensures that you get the best taste and health benefits without harmful pesticides or chemicals. Here’s why fresh, organic raspberries make a difference:
- Superior Taste and Freshness – Organic raspberries are grown without synthetic fertilizers or pesticides, allowing them to develop their full, natural sweetness and tangy flavor.
- Nutrient-Rich – Packed with vitamins C and K, fiber, and powerful antioxidants, raspberries add a healthy element to your dessert.
- Pesticide-Free – Since raspberries have a delicate, porous skin, they can easily absorb chemicals. Organic raspberries are grown naturally, making them a safer choice.
- Vibrant Color and Texture – Their bright red hue provides a beautiful contrast against the dark chocolate ganache and creamy coconut filling, making your cake visually stunning.
How to Select and Store Fresh Raspberries
To get the most out of your raspberries, choose and store them properly:
- Look for Firm, Plump Berries – Ripe raspberries should be bright red, firm, and free from mold or mushiness.
- Check for Dryness – Moisture can cause raspberries to spoil quickly. Choose berries that are dry and loosely packed in their container.
- Store Them Properly – Keep raspberries refrigerated and consume them within 2-3 days for optimal freshness. For longer storage, freeze them on a baking sheet before transferring them to an airtight container.
Ways to Incorporate Fresh Raspberries into Your Cake
There are many ways to use fresh raspberries in your chocolate coconut cake:
- As a Filling Layer: Spread fresh raspberries between the cake layers to add bursts of tartness with every bite.
- In the Ganache or Glaze: Blend raspberries into your chocolate ganache for a fruity twist.
- As a Garnish: Top the finished cake with a generous handful of raspberries for a beautiful and elegant presentation.
- In a Raspberry Coulis: Drizzle a homemade raspberry sauce over each slice for an extra layer of fruity sweetness.
Pairing Raspberries with Chocolate and Coconut
Raspberries pair exceptionally well with both chocolate and coconut. Their tartness balances the deep, rich flavors of dark chocolate while complementing the creamy, tropical sweetness of coconut. This combination creates a well-rounded dessert that’s indulgent yet refreshing.
Key Baking Tools Needed: Essential Equipment for the Perfect Cake
Baking a flawless chocolate coconut cake requires more than just high-quality ingredients—it also depends on having the right tools. Using proper baking equipment ensures consistent results, helps streamline the process, and enhances the overall texture and presentation of your cake. Below is a list of essential baking tools you’ll need to create a delicious and well-crafted dessert.
1. Mixing Bowls
A set of high-quality mixing bowls is crucial for combining ingredients efficiently. Stainless steel or glass bowls are preferred since they don’t absorb odors and allow for easy mixing. Use different sizes to separate wet and dry ingredients before combining them.
2. Electric Mixer (Hand or Stand Mixer)
While you can mix ingredients by hand, an electric mixer (either a hand mixer or a stand mixer) makes the process much easier. It helps in:
- Creaming butter and sugar for a light and fluffy texture.
- Mixing the batter evenly without overworking it.
- Whipping cream or egg whites for airy and soft textures.
3. Measuring Cups and Spoons
Accurate measurements are key to successful baking. A set of dry and liquid measuring cups, along with measuring spoons, ensures precise ingredient ratios. Always level off dry ingredients for the best accuracy.
4. Sifter or Fine-Mesh Strainer
Sifting flour, cocoa powder, and baking soda helps prevent clumping and incorporates air into the mixture, leading to a lighter cake. If you don’t have a sifter, a fine-mesh strainer works just as well.
5. Rubber Spatula and Whisk
- Rubber spatula – Ideal for scraping batter from bowls, folding ingredients, and evenly spreading frosting or ganache.
- Whisk – Helps aerate ingredients while mixing, which is crucial for smooth batters and perfectly combined liquids.
6. Cake Pans
The right cake pans ensure even baking and a well-formed structure. For a classic layered cake, use:
- Two 8-inch or 9-inch round cake pans for even layers.
- A springform pan if you prefer a single deep cake that can be sliced horizontally.
- Non-stick or parchment paper lining to prevent sticking and ensure easy removal.
7. Cooling Rack
A cooling rack is essential for allowing air circulation around the cake, preventing condensation that could make the bottom soggy. Let the cake cool completely before frosting to avoid melting the ganache or buttercream.
8. Offset Spatula and Cake Turntable
For a professional-looking finish:
- Use an offset spatula to smoothly spread frosting, ganache, or cream.
- A cake turntable makes decorating easier by allowing you to rotate the cake as you frost.
9. Double Boiler or Microwave-Safe Bowl
Melting chocolate properly is crucial for a smooth ganache or drizzle.
- A double boiler (a heatproof bowl over simmering water) gently melts chocolate without burning it.
- A microwave-safe bowl can also be used, but ensure you stir every 20-30 seconds to prevent overheating.
10. Serrated Knife or Cake Leveler
If you’re making a layered cake, a serrated knife or cake leveler helps trim the tops for an even surface. This step ensures a professional and well-balanced final cake.
11. Pastry Brush and Piping Bags (Optional)
- A pastry brush is great for adding simple syrup to cakes to keep them moist.
- Piping bags and decorating tips help create intricate designs and decorations if you want to add an extra touch of elegance.
Final Thoughts
Having the right baking tools not only simplifies the process but also ensures your chocolate coconut cake turns out perfectly every time. Investing in quality equipment can make a noticeable difference in texture, presentation, and ease of preparation.
Preparing the Chocolate Ganache
Step-by-Step Guide to Making Ganache: The Perfect Chocolate Topping
Ganache is a rich, smooth, and glossy chocolate mixture that can be used for glazing, frosting, filling, or drizzling over cakes, including your decadent chocolate coconut cake. This simple yet luxurious element adds depth of flavor and an indulgent finish. Below is a comprehensive step-by-step guide to making the perfect ganache.
What is Ganache?
Ganache is a blend of chocolate and heavy cream, sometimes enhanced with butter or flavorings. The ratio of chocolate to cream determines its consistency, whether thick and spreadable for frosting or thin and pourable for a glaze.
Basic Ganache Ratio Guide:
- 1:1 (Equal parts chocolate and cream): Perfect for drips, glazes, and pourable toppings.
- 2:1 (More chocolate than cream): Creates a thicker consistency, ideal for truffles and firm frosting.
- 3:1 (Mostly chocolate): Used for sculpting or chocolate decorations.
Ingredients You’ll Need
- 8 oz (225g) high-quality dark chocolate, finely chopped
- 1 cup (240ml) heavy cream (also called heavy whipping cream)
- 1 tbsp unsalted butter (optional, for extra gloss)
- 1 tsp vanilla extract (optional, for added flavor)
Step 1: Prepare the Chocolate
Start by chopping the chocolate into small, uniform pieces. This helps it melt evenly when combined with the cream. Place the chopped chocolate in a heatproof bowl.
Step 2: Heat the Cream
In a small saucepan, heat the heavy cream over medium heat until it starts to steam and small bubbles form around the edges. Do not boil—boiling can cause the cream to separate and affect the texture of the ganache.
Step 3: Pour and Let Sit
Immediately pour the hot cream over the chopped chocolate. Let it sit undisturbed for about 2-3 minutes to allow the chocolate to soften.
Step 4: Stir Until Smooth
After letting it sit, use a spatula or whisk to gently stir the mixture in slow, circular motions until it becomes smooth and glossy. If there are any unmelted bits, let it sit for another minute before stirring again.
Step 5: Add Butter and Flavoring (Optional)
For extra shine and a richer flavor, stir in 1 tablespoon of butter and 1 teaspoon of vanilla extract while the ganache is still warm. Mix until fully incorporated.
Step 6: Adjust the Consistency
Depending on how you want to use the ganache, you can adjust its consistency:
- For a pourable glaze: Use immediately while still warm.
- For a spreadable frosting: Let it cool for about 30 minutes at room temperature until it thickens.
- For a whipped ganache frosting: Allow it to cool completely, then beat with an electric mixer for a light and fluffy texture.
Step 7: Apply to Your Cake
Ganache can be used in multiple ways:
- Drizzle or glaze: Pour over the top of the cake and let it drip down the sides.
- Frosting layer: Spread over the cake with an offset spatula for a smooth, rich finish.
- Filling: Use between cake layers for an extra indulgent bite.
- Piping decorations: Once cooled and thickened, pipe elegant designs for added texture.
Pro Tips for Perfect Ganache
Use high-quality chocolate: The better the chocolate, the better the flavor and texture.
Do not overheat the cream: Overheating can cause separation. Keep it warm but not boiling.
Stir gently: Vigorous stirring can introduce air bubbles, making the ganache less smooth.
Reheat gently if needed: If the ganache hardens, microwave it in 5-second intervals, stirring each time.
Final Thoughts
Ganache is one of the easiest yet most luxurious ways to elevate your chocolate coconut cake. With its smooth texture, deep chocolate flavor, and versatility, it transforms any dessert into a gourmet masterpiece.
Tips for a Smooth and Glossy Finish
Achieving a smooth and glossy finish on your chocolate coconut cake requires precision, technique, and a few expert tricks. Whether you’re using ganache, glaze, or frosting, these tips will ensure your cake looks professional and polished.
1. Use High-Quality Ingredients
The quality of your ingredients directly impacts the final appearance.
Chocolate: Use high-quality dark chocolate (at least 60% cocoa) for a rich sheen.
Cream: Full-fat heavy cream helps achieve a luscious, glossy ganache.
Butter: Adding a small amount of butter to melted chocolate enhances its shine.
2. Properly Melt Chocolate for a Silky Texture
Melting chocolate the right way prevents it from seizing or becoming dull.
Double Boiler Method: Heat chocolate gently over a pot of simmering water, stirring frequently.
Microwave Method: Heat in short 10-second bursts, stirring after each interval.
Avoid Water Contact: Even a drop of water can cause the chocolate to seize and turn grainy.
3. Achieve the Perfect Ganache Consistency
Ganache is key to a glossy cake finish. Follow these steps for the best results:
Heat cream until warm, not boiling. Boiling cream can cause separation.
Let the chocolate sit in hot cream for 2-3 minutes before stirring.
Stir gently and in circular motions to avoid air bubbles.
Add butter (optional) for extra shine and smoothness.
4. Apply the Ganache or Glaze Correctly
How you apply your glaze or ganache determines its final look.
Use a turntable: This helps evenly spread the ganache over the cake.
Pour in the center and spread outward: This ensures smooth coverage.
Use an offset spatula: For a seamless, professional-looking finish.
Tap the cake board: This removes air bubbles and smooths the surface.
5. Chill Between Layers for a Polished Look
Layering ganache too quickly can create an uneven texture.
Let the first layer set before adding another. This prevents streaks.
Refrigerate for 10-15 minutes between layers for a firm foundation.
Use a hot spatula for smoothing: Run a spatula under hot water, dry it, and glide over the cake for a flawless finish.
6. Avoid Common Mistakes
Don’t overheat the chocolate. It can burn and lose its shine.
Don’t stir too vigorously. This introduces air bubbles.
Don’t apply ganache to a warm cake. Always let the cake cool first.
7. The Final Touch: A Stunning Presentation
Polish with a warm spatula for a sleek, mirror-like finish.
Use chocolate shavings, gold flakes, or coconut sprinkles for added elegance.
Let the cake set at room temperature for a natural, glossy sheen.
Common Mistakes to Avoid
When baking a chocolate coconut cake, small mistakes can affect the texture, flavor, and overall presentation. Whether you’re making the sponge, ganache, or assembling the layers, avoiding these common pitfalls will ensure a flawless, bakery-quality dessert.
1. Using Low-Quality Chocolate
The quality of your chocolate directly impacts the taste and texture of the cake.
Mistake: Using cheap or compound chocolate that contains too many additives.
Solution: Choose high-quality dark chocolate (60-70% cocoa) for a rich flavor and smooth ganache.
2. Overmixing the Batter
Overmixing can lead to a dense or tough cake.
Mistake: Mixing the batter too much, which develops excess gluten.
Solution: Mix until just combined to keep the cake light and fluffy.
3. Not Measuring Ingredients Properly
Baking is a science, and incorrect measurements can ruin the cake’s consistency.
Mistake: Estimating ingredients or using measuring cups incorrectly.
Solution: Use a digital kitchen scale for accurate measurements, especially for flour and cocoa powder.
4. Baking at the Wrong Temperature
Temperature affects how evenly the cake bakes.
Mistake: Setting the oven too high (burnt edges, raw center) or too low (dense, undercooked cake).
Solution: Preheat the oven and use an oven thermometer to ensure accuracy. Bake at 325°F–350°F (163°C–177°C) for the best results.
5. Opening the Oven Door Too Early
Sudden temperature changes can cause the cake to collapse.
Mistake: Checking the cake too soon or too often.
Solution: Wait until the last 5-10 minutes of baking before opening the oven.
6. Skipping the Cake Cooling Process
Cooling is crucial before frosting or assembling.
Mistake: Frosting a warm cake, causing the ganache to melt.
Solution: Let the cake cool in the pan for 10-15 minutes, then transfer to a wire rack to cool completely before decorating.
7. Incorrect Ganache Consistency
Ganache can turn grainy or split if not made correctly.
Mistake: Overheating the cream or stirring too vigorously.
Solution:
Heat the cream until warm, not boiling.
Let the chocolate sit for 2-3 minutes before stirring gently in circular motions.
8. Applying Ganache on a Dry or Crumbly Cake
A dry cake absorbs too much ganache and creates an uneven finish.
Mistake: Skipping syrup or not prepping the cake layers properly.
Solution:
Brush the cake layers with simple syrup (sugar + water) to keep them moist.
Crumb coat the cake with a thin layer of ganache before final decoration.
9. Rushing the Assembly Process
Patience is key when assembling a layered cake.
Mistake: Stacking layers too quickly or not chilling the cake before slicing.
Solution: Chill the cake for at least 30 minutes before cutting to get clean, even layers.
10. Storing the Cake Improperly
Improper storage can make the cake dry or stale.
Mistake: Leaving the cake uncovered in the fridge.
Solution: Cover with plastic wrap or an airtight container to retain moisture. Store at room temperature for up to 2 days or refrigerate for up to 5 days.
Baking the Perfect Cake Layers

Recipe for Moist Chocolate Sponge
This moist chocolate sponge is rich, soft, and perfect for cakes, layered desserts, or simply enjoying on its own. It has a deep chocolate flavor with a tender crumb that stays moist for days.
Ingredients:
- 1 ¾ cups (220g) all-purpose flour
- ¾ cup (75g) unsweetened cocoa powder
- 2 cups (400g) granulated sugar
- 1 ½ teaspoons baking powder
- 1 ½ teaspoons baking soda
- ½ teaspoon salt
- 2 large eggs
- 1 cup (240ml) buttermilk (or substitute with 1 cup milk + 1 tbsp vinegar)
- ½ cup (120ml) vegetable oil
- 2 teaspoons vanilla extract
- 1 cup (240ml) hot coffee or hot water (enhances the chocolate flavor)
Instructions:
- Preheat the oven to 350°F (175°C). Grease and line two 8-inch (20cm) round cake pans with parchment paper.
- Mix the dry ingredients – In a large bowl, sift together the flour, cocoa powder, sugar, baking powder, baking soda, and salt.
- Add the wet ingredients – Whisk in the eggs, buttermilk, vegetable oil, and vanilla extract until smooth.
- Incorporate the hot liquid – Slowly pour in the hot coffee (or hot water) while stirring. The batter will be thin, but this helps create a moist texture.
- Bake – Divide the batter evenly between the pans and bake for 30-35 minutes, or until a toothpick inserted in the center comes out clean.
- Cool and serve – Let the cakes cool in the pans for 10 minutes, then transfer to a wire rack to cool completely.
Tips for Extra Moistness:
- Use buttermilk instead of regular milk for added richness.
- Don’t overbake—check with a toothpick to ensure it’s just set.
- Brush the cake layers with simple syrup for an ultra-moist texture.
Mixing Batter Without Overmixing
Properly mixing batter is key to achieving a light, fluffy texture in cakes, muffins, and pancakes. Overmixing can lead to tough, dense baked goods due to excess gluten development. Here’s how to mix batter just right:
1. Understand the Purpose of Mixing
Mixing combines ingredients evenly, distributes leavening agents (baking powder/soda), and incorporates air for a soft texture. However, excessive mixing strengthens gluten strands, making baked goods chewy instead of tender.
2. Follow the Correct Mixing Method
Different batters require different techniques:
- Creaming Method (for cakes & cookies): Beat butter and sugar first, then add eggs and dry ingredients.
- Muffin Method (for muffins & quick breads): Mix wet and dry ingredients separately, then gently fold them together.
- One-Bowl Method (for simple cakes): Mix all ingredients in a single bowl, stirring until just combined.
3. Use the Right Tools
- Whisk for light batters like pancakes.
- Spatula or wooden spoon for folding ingredients gently.
- Hand or stand mixer on low speed for cake batters.
4. Mix Until Just Combined
- Stir until no dry flour is visible—a few lumps are fine.
- Stop mixing as soon as ingredients are evenly distributed.
- For delicate batters, fold gently using a spatula in a figure-eight motion.
5. Avoid Overworking the Batter
- If using a mixer, keep it on low speed and avoid prolonged beating.
- Rest thick batters (like pancake or muffin batter) for a few minutes before baking to allow gluten to relax.
Baking at the Correct Temperature
Baking at the right temperature is crucial for achieving perfectly baked goods with the right texture, rise, and flavor. Whether you’re making cakes, cookies, or bread, precise temperature control ensures consistent results.
1. Why Temperature Matters
- Proper Rise: The correct heat activates leavening agents (baking powder, baking soda, yeast), helping baked goods rise properly.
- Even Baking: Too high a temperature can cause the outside to burn while the inside remains undercooked. Too low, and your baked goods may turn dense and dry.
- Golden Brown Crust: Caramelization and the Maillard reaction (browning of sugars and proteins) occur at the right temperature, giving baked goods a delicious golden color.
2. Common Baking Temperatures & When to Use Them
- 325°F (163°C) – Slow baking for delicate cakes, cheesecakes, and custards.
- 350°F (175°C) – The standard for most cakes, cookies, and muffins.
- 375°F (190°C) – Slightly higher heat for pastries and crusty breads.
- 400°F (200°C) & above – Best for pizza, puff pastry, and roasting.
3. How to Ensure Accurate Baking Temperatures
- Preheat the Oven: Always preheat for at least 10-15 minutes before baking.
- Use an Oven Thermometer: Built-in oven dials can be inaccurate—an oven thermometer ensures precision.
- Avoid Frequent Door Opening: Opening the oven door releases heat, causing temperature fluctuations that can affect baking.
4. Adjusting for Different Ovens
- Convection Ovens: Reduce the temperature by 25°F (15°C) since the fan circulates heat more efficiently.
- Gas vs. Electric Ovens: Gas ovens can have uneven heat distribution, so rotating the tray halfway through baking may help.
Tips for Serving and Storing the Cake
Presentation Tips for a Professional Look
How you present your baked goods can elevate them from homemade to professional-quality. From simple techniques to elegant touches, let’s explore how to make your treats look stunning!
1. Choose the Right Serving Dish
- Plates and Platters: Opt for white or neutral-colored dishes to let your baked goods stand out.
- Cake Stands: Add height and elegance to cakes and cupcakes by using a tiered stand.
- Rustic Boards: Wooden or slate boards give a rustic, artisanal vibe, perfect for breads and pastries.
2. Add Garnishes Thoughtfully
- Fresh Fruits: Berries, citrus slices, or edible flowers add a pop of color and freshness.
- Dustings: A light dusting of powdered sugar or cocoa powder can make desserts look polished. Use stencils for fun shapes!
- Herbs: A sprig of mint or rosemary can add an aromatic touch, especially to cakes and tarts.
3. Neat and Clean Edges
- Trim Edges: For bars and brownies, use a sharp knife and wipe it clean between cuts for crisp, clean lines.
- Frosting: Use a bench scraper or offset spatula to smooth frosting evenly around cakes. Consider a piping bag for decorative borders.
- Glazing: Let glazes drip naturally over the edges of cakes or pastries for a professional, effortless look.
4. Create Layers and Textures
- Layered Desserts: In clear glasses or jars, layer ingredients like mousses, crumbles, and fruits for a visually appealing dessert.
- Textures: Combine smooth (chocolate ganache) with crunchy (toasted nuts) elements for contrast.
5. Pay Attention to Color Balance
- Complementary Colors: Match the colors of your garnish to the main dessert for a cohesive look.
- Seasonal Themes: Reflect the season with your color palette — warm tones for fall, pastels for spring.
6. Keep It Simple
- Sometimes less is more! A minimalist approach can feel more refined. Focus on a single statement element, like a perfect swirl of frosting or a single fresh flower.
Best Practices for Cutting and Serving
Cutting and serving baked goods properly ensures clean slices, even portions, and a beautiful presentation. Whether you’re slicing cakes, brownies, bread, or pies, following these best practices will make your desserts look as good as they taste.
1. Use the Right Knife for the Job
Different baked goods require different knives for clean, precise cuts:
- Serrated Knife – Best for breads, cakes, and pastries with delicate or crisp edges.
- Chef’s Knife – Ideal for brownies, bars, and dense cakes.
- Paring Knife – Perfect for small desserts like tarts or mini cakes.
- Bench Scraper or Dough Cutter – Great for cutting brownies and bars evenly.
2. Keep Your Knife Clean and Warm
- For clean cuts – Wipe the blade with a warm, damp cloth between slices to prevent buildup.
- For cakes with frosting – Dip the knife in warm water, wipe dry, then slice to prevent smearing.
3. Cut Even Portions
- Use a ruler – Mark out slices for bars, brownies, and sheet cakes to ensure uniform pieces.
- For round cakes – Use the wedge method (cutting like a pizza) or the grid method (cutting squares from larger round cakes) for even portions.
- For cheesecakes and mousse cakes – Use a hot knife and wipe clean between each cut for the best presentation.
4. Let Baked Goods Cool Properly
- For cakes and brownies – Cutting while warm can cause crumbling. Let them cool completely for clean edges.
- For bread – Cutting fresh bread while it’s hot releases steam, making the interior gummy. Let it rest for at least 30 minutes.
5. Use the Right Serving Tools
- Cake Server or Offset Spatula – Ideal for neatly lifting cake slices.
- Pie Server – A triangular spatula designed for serving pies and tarts without breaking the crust.
- Tongs or Forks – Useful for sticky pastries like cinnamon rolls.
6. Arrange for an Elegant Presentation
- Stack layers – For brownies or bars, stack pieces neatly on a platter.
- Use a cake stand – Elevates cakes and makes them the centerpiece of the table.
- Garnish plates – Add a drizzle of sauce, a dusting of powdered sugar, or fresh berries for a professional look.
How to Store the Cake to Maintain Freshness
Proper storage is key to keeping your cake moist, flavorful, and fresh for as long as possible. Whether it’s a frosted cake, an unfrosted sponge, or leftover slices, here are the best ways to store your cake based on its type and ingredients.
1. Storing Unfrosted Cakes
If you’ve baked a cake but haven’t frosted it yet, follow these steps:
Cool Completely – Let the cake cool at room temperature before storing to prevent condensation buildup.
Wrap in Plastic Wrap – Tightly wrap the cake layers in plastic wrap to prevent them from drying out.
Store at Room Temperature (1-2 Days) – Keep in an airtight container or wrap in plastic wrap and aluminum foil.
Refrigerate for Longer Storage (Up to a Week) – Wrap well and place in an airtight container in the fridge.
Freeze for Extended Storage (Up to 3 Months) – Wrap layers individually in plastic wrap and store in freezer bags. Thaw at room temperature before frosting.
2. Storing Frosted Cakes
Once a cake is frosted, it requires extra care to prevent the frosting from drying out or absorbing fridge odors.
Use a Cake Dome or Airtight Container – A cake keeper or an overturned bowl can protect the frosting.
Refrigerate if Necessary – If the cake has perishable ingredients (like cream cheese frosting or fresh fruit), refrigerate it.
Let It Come to Room Temperature Before Serving – Chilled cakes can become firm, so leave them out for 30-60 minutes before slicing.
3. Storing Leftover Cake Slices
If you’ve already cut into the cake, store the slices properly to maintain moisture.
Press Plastic Wrap Against Cut Edges – This prevents the cake from drying out.
Place in an Airtight Container – Store slices in a container to keep them fresh longer.
Refrigerate for Up to 5 Days – Most cakes stay fresh in the fridge when stored properly.
4. Freezing Cake for Long-Term Storage
If you need to store cake for weeks or months, freezing is the best option.
Wrap Tightly in Plastic Wrap and Foil – Double wrapping prevents freezer burn.
Use Freezer Bags or Containers – This helps protect the cake from absorbing odors.
Label with Date – Write the freezing date to keep track. Cakes stay fresh for 2-3 months in the freezer.
Thaw Properly – Let the cake thaw overnight in the fridge or at room temperature for a few hours before serving.
5. Special Cake Storage Tips
Cakes with Fresh Fruit – Must be refrigerated and eaten within 2-3 days.
Cakes with Whipped Cream Frosting – Best stored in the fridge and consumed within 1-2 days.
Fondant-Covered Cakes – Store at room temperature in a cool, dry place to prevent sweating.
Conclusion
A Chocolate Ganache Cake is the ultimate indulgence, and following these 10 key tips ensures a moist, rich, and visually stunning dessert every time. Let’s quickly recap:
Use High-Quality Chocolate – The ganache is the star, so choose premium chocolate with at least 50-70% cocoa.
Measure Ingredients Accurately – Precision is key to perfect texture; use a kitchen scale for best results.
Choose the Right Cocoa Powder – Opt for unsweetened cocoa (Dutch-process for smoothness, natural for intensity).
Don’t Overmix the Batter – Mix just until combined to keep the cake light and fluffy.
Bake at the Right Temperature – 350°F (175°C) is ideal; avoid overbaking to retain moisture.
Let the Cake Cool Completely – Applying ganache to a warm cake causes melting and uneven coverage.
Make a Smooth, Shiny Ganache – Use warm heavy cream, stir gently, and let it sit before whisking.
Use a Crumb Coat for a Professional Finish – A thin first layer helps achieve a smooth final ganache coating.
Decorate with Style – Add chocolate curls, berries, or gold dust for an elegant touch.
Store Properly for Freshness – Keep at room temperature for 2 days, refrigerate for up to 5 days, or freeze for 3 months.
Baking the perfect Chocolate Ganache Cake is both an art and a science, and everyone has their own unique touches that make their cake special. Whether it’s a secret ingredient, a decorating technique, or a storage trick, we’d love to hear from you!
What are your go-to tips for the ultimate Chocolate Ganache Cake?
Do you have a favorite variation or flavor twist?
Share your baking experiences and pictures—we’d love to see your delicious creations!