
Table of Contents
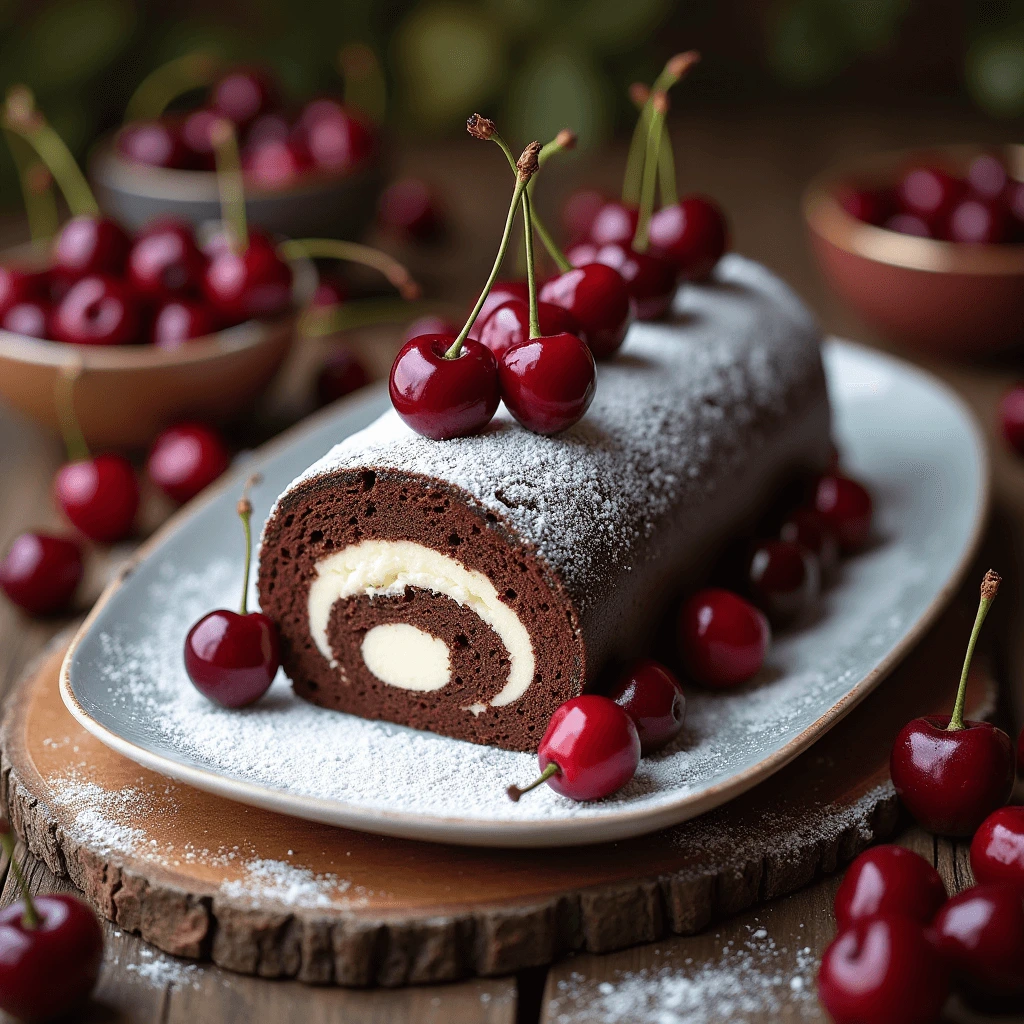
There’s something incredibly comforting and nostalgic about a perfectly made Swiss roll. This delightful dessert has charmed many with its light, airy sponge and luscious filling, all elegantly rolled into a spiral. Among the various flavors, the Chocolate Swiss Roll stands out as an all-time favorite. The rich, cocoa-infused sponge cake, paired with a creamy filling, creates a harmonious blend of textures and flavors that is hard to resist. Whether you’re a novice baker looking for an impressive yet simple recipe, or an experienced cook aiming to perfect this classic treat, this easy Chocolate Swiss Roll recipe will guide you through every step to achieve a delicious and visually stunning dessert.
Ingredients and Equipment
List of Ingredients
In this section, we’ll cover all the ingredients you need to make a delightful Chocolate Swiss Roll. Having everything ready before you start baking will ensure a smooth and enjoyable experience. Here’s a detailed list of what you’ll need:
For the Sponge Cake:
- Eggs: 4 large eggs, preferably at room temperature. This helps achieve maximum volume when whisking.
- Granulated Sugar: 1 cup (200g). This will sweeten the cake and help create a light, airy texture.
- All-Purpose Flour: 3/4 cup (90g), sifted. Sifting prevents lumps and ensures a smooth batter.
- Cocoa Powder: 1/4 cup (25g), sifted. Use high-quality cocoa powder for a rich chocolate flavor.
- Baking Powder: 1 teaspoon. This will help the cake rise and become fluffy.
- Salt: A pinch. This enhances the overall flavor of the cake.
- Vanilla Extract: 1 teaspoon. Adds a lovely aroma and subtle flavor to the cake.
For the Filling:
- Heavy Cream: 1 cup (240ml), cold. Whipping the cream when it’s cold helps achieve stiff peaks.
- Powdered Sugar: 2 tablespoons. Sweetens the cream without making it grainy.
- Vanilla Extract: 1 teaspoon. Complements the sweetness of the cream and adds depth of flavor.
- Optional Add-ins: Chocolate chips, fruit preserves, or cocoa powder for an extra chocolatey twist.
For Dusting and Decoration:
- Powdered Sugar: For dusting the finished roll and giving it a professional touch.
- Cocoa Powder: Optional, for an additional dusting of chocolate flavor.
- Chocolate Ganache: Optional, for a decadent finish (made by melting chocolate and mixing with warm cream).
Additional Ingredients (Optional):
- Jam or Fruit Preserves: For a fruity filling variation.
- Buttercream or Cream Cheese Frosting: As an alternative to whipped cream.
Baking Equipment Needed
To ensure a seamless baking experience, it’s essential to have all the necessary tools and equipment on hand. Here’s a detailed list of what you’ll need for making the perfect Chocolate Swiss Roll:
1. Baking Tray:
- A shallow, rimmed baking tray (also known as a jelly roll pan) is ideal for this recipe. The standard size is approximately 10×15 inches (25×38 cm).
- Ensures even baking and provides the perfect shape for rolling.
2. Parchment Paper:
- Lining your baking tray with parchment paper prevents the cake from sticking and makes it easier to roll.
- It also makes cleanup a breeze.
3. Mixing Bowls:
- You’ll need a few mixing bowls in different sizes for separating ingredients, mixing the batter, and whipping the cream.
- Opt for stainless steel or glass bowls for easy handling and durability.
4. Whisk and Electric Mixer:
- A hand whisk is useful for initial mixing, while an electric mixer (handheld or stand mixer) is essential for whipping the egg whites and cream to the desired consistency.
- The mixer helps achieve a light and airy batter and perfectly whipped cream.
5. Sifter:
- Sifting the flour and cocoa powder ensures a smooth, lump-free batter.
- This step is crucial for achieving a light and fluffy sponge cake.
6. Spatula and Mixing Spoon:
- A silicone spatula is great for folding the batter gently without deflating it.
- A mixing spoon helps incorporate ingredients smoothly.
7. Cooling Rack:
- Allows the cake to cool evenly and prevents it from becoming soggy.
- Essential for achieving the perfect texture.
8. Clean Kitchen Towel:
- Used for rolling the cake while it’s still warm to help it hold its shape.
- A lightly dusted towel with powdered sugar prevents sticking.
9. Serrated Knife:
- For trimming the edges of the cake and slicing the finished roll cleanly.
- Ensures neat, professional-looking slices.
10. Measuring Cups and Spoons:
- Accurate measurements are crucial for baking success.
- Ensure you have a complete set for both dry and liquid ingredients.
Tips on Selecting the Best Ingredients
Choosing high-quality ingredients can make a significant difference in the taste and texture of your Chocolate Swiss Roll. Here are some tips to help you select the best ingredients for this delicious dessert:
1. Eggs:
- Freshness: Choose fresh, organic eggs if possible. Fresh eggs will give your sponge cake a better rise and a more stable structure.
- Room Temperature: For better volume and easier mixing, bring your eggs to room temperature before using them. You can do this by placing them in a bowl of warm water for a few minutes.
2. Granulated Sugar:
- Fine Sugar: Use fine granulated sugar, as it dissolves more easily and helps achieve a smooth batter. Avoid coarse sugar, which may not dissolve completely.
- Quality: Opt for high-quality sugar with no additives or clumps.
3. All-Purpose Flour:
- Sifting: Always sift your flour to prevent lumps and ensure a light, airy sponge. This step is crucial for achieving the right texture.
- Brand: Choose a reputable brand of all-purpose flour for consistent results. Look for unbleached flour if you prefer a more natural option.
4. Cocoa Powder:
- Quality: Use high-quality, unsweetened cocoa powder. The better the cocoa powder, the richer the chocolate flavor will be. Brands like Valrhona or Ghirardelli are excellent choices.
- Sifting: Just like with flour, sift the cocoa powder to avoid lumps and ensure even distribution in the batter.
5. Baking Powder:
- Freshness: Check the expiration date on your baking powder. Fresh baking powder is essential for proper rising and fluffiness.
- Storage: Store baking powder in a cool, dry place to maintain its potency.
6. Salt:
- Type: Use fine sea salt or table salt for baking. Avoid coarse salt, as it may not dissolve evenly.
- Measurement: Be precise with your measurements, as too much or too little salt can affect the taste of your cake.
7. Vanilla Extract:
- Pure vs. Imitation: Always opt for pure vanilla extract instead of imitation. Pure vanilla has a more authentic and richer flavor.
- Brand: Choose a reputable brand known for high-quality vanilla extract, such as Nielsen-Massey.
8. Heavy Cream:
- Cold Cream: Use cold heavy cream for whipping, as it whips up faster and holds its shape better. Store it in the refrigerator until you’re ready to use it.
- High Fat Content: Look for heavy cream with a high fat content (at least 36%) for the best texture and flavor.
9. Powdered Sugar:
- Quality: Use high-quality powdered sugar for sweetening the whipped cream. Ensure it’s free of lumps by sifting it before use.
- Storage: Keep powdered sugar in an airtight container to prevent clumping and moisture absorption.
10. Optional Add-ins:
- Chocolate Chips: Choose high-quality chocolate chips with a high cocoa content for a richer taste.
- Fruit Preserves: Use natural, no-sugar-added fruit preserves for a healthier option.
- Cocoa Powder: If adding extra cocoa powder to the filling, make sure it’s the same high-quality cocoa powder used in the sponge.
Step-by-Step Instructions
Preparing the Batter
Creating the perfect batter for your Chocolate Swiss Roll is a critical step that sets the foundation for a light, airy, and flavorful sponge cake. Here’s a detailed guide to ensure your batter is just right:
1. Preheat Your Oven:
- Temperature: Start by preheating your oven to 350°F (175°C). Ensuring the oven is properly preheated will help your cake bake evenly and rise well.
- Oven Rack: Position the oven rack in the middle to ensure even heat distribution.
2. Prepare Your Baking Tray:
- Lining: Line a 10×15 inch (25×38 cm) baking tray with parchment paper. Make sure the parchment paper extends slightly over the edges to make it easier to lift the cake out later.
- Grease (Optional): If desired, lightly grease the parchment paper to ensure the cake doesn’t stick.
3. Separate the Eggs:
- Egg Whites and Yolks: Carefully separate 4 large eggs into two mixing bowls, one for the whites and one for the yolks. Make sure no yolk gets into the whites, as this can prevent them from whipping properly.
- Room Temperature: Allow the eggs to come to room temperature for better volume when whisking.
4. Whip the Egg Whites:
- Soft Peaks: Using an electric mixer, beat the egg whites on medium speed until they form soft peaks. This means the whites will hold their shape but still be slightly soft and droopy.
- Gradual Sugar Addition: Gradually add half of the granulated sugar (1/2 cup or 100g) to the egg whites while continuing to beat them. Increase the mixer speed to high and beat until stiff peaks form. Stiff peaks will stand straight up when the beaters are lifted.
5. Mix the Egg Yolks:
- Beat Yolks: In the other mixing bowl, beat the egg yolks with the remaining sugar (1/2 cup or 100g) until the mixture is pale, thick, and creamy. This will take about 3-4 minutes.
- Vanilla Extract: Add 1 teaspoon of vanilla extract to the yolk mixture and beat until combined.
6. Combine the Dry Ingredients:
- Sift Together: In a separate bowl, sift together 3/4 cup (90g) of all-purpose flour, 1/4 cup (25g) of cocoa powder, 1 teaspoon of baking powder, and a pinch of salt. Sifting ensures there are no lumps and helps aerate the flour.
- Gently Fold: Gradually add the dry ingredients to the egg yolk mixture, folding gently with a spatula until just combined. Be careful not to overmix, as this can deflate the batter.
7. Incorporate the Egg Whites:
- Fold in Thirds: Gently fold one-third of the whipped egg whites into the batter to lighten it. Once incorporated, carefully fold in the remaining egg whites in two more additions. Use a gentle folding motion to maintain as much air as possible in the batter.
8. Pour and Spread:
- Even Layer: Pour the batter into the prepared baking tray and spread it evenly using a spatula. Make sure the batter reaches all corners of the tray and is smooth on the surface.
9. Ready to Bake:
- Bake Time: Place the tray in the preheated oven and bake for 10-12 minutes, or until the cake springs back when lightly pressed and a toothpick inserted into the center comes out clean.
- Avoid Overbaking: Be careful not to overbake, as this can make the cake dry and difficult to roll.
Baking the Swiss Roll
Baking the Swiss roll is a crucial step to achieving a perfectly light and fluffy cake that can be easily rolled without cracking. Here’s a detailed guide to ensure your Swiss roll turns out just right:
1. Preheat the Oven:
- Temperature: Preheat your oven to 350°F (175°C). Proper preheating ensures the cake bakes evenly and rises properly.
- Positioning: Place the oven rack in the middle position to ensure even heat distribution.
2. Prepare the Baking Tray:
- Lining: Line a 10×15 inch (25×38 cm) baking tray with parchment paper. Make sure the parchment paper extends slightly over the edges for easy removal later.
- Optional Grease: Lightly grease the parchment paper to ensure the cake doesn’t stick.
3. Spread the Batter:
- Even Layer: Pour the prepared batter into the lined baking tray and spread it evenly using a spatula. Ensure the batter reaches all corners of the tray and is smooth on the surface.
- Thickness: Aim for an even thickness throughout the batter to ensure uniform baking.
4. Bake the Cake:
- Baking Time: Place the tray in the preheated oven and bake for 10-12 minutes. Keep an eye on the cake as it bakes.
- Testing for Doneness: The cake is done when it springs back when lightly pressed and a toothpick inserted into the center comes out clean.
- Avoid Overbaking: Be cautious not to overbake, as this can make the cake dry and more prone to cracking when rolled.
5. Remove from the Oven:
- Cooling: Once baked, remove the tray from the oven and let it cool for a few minutes. This will make handling the cake easier.
- Loosening the Edges: Run a knife around the edges of the cake to loosen it from the tray.
6. Prepare for Rolling:
- Dusting: While the cake is still warm, dust the surface with powdered sugar. This prevents sticking when rolling.
- Transfer to Towel: Place a clean kitchen towel over the cake, then invert the baking tray to transfer the cake onto the towel. Carefully peel off the parchment paper.
7. Roll the Cake:
- Initial Roll: Starting from one short end, gently roll the cake along with the towel. This initial roll helps the cake form the rolled shape and prevents cracking later.
- Cooling in Shape: Let the rolled cake cool completely in this shape. This step helps the cake retain its flexibility for the final assembly.
Rolling the Cake
Rolling the cake is a delicate process that transforms your flat sponge cake into an elegant and delicious Chocolate Swiss Roll. Here’s a detailed guide to help you achieve a perfect roll without cracks:
1. Prepare for Rolling:
- Dust with Powdered Sugar: As soon as your cake comes out of the oven, dust the surface generously with powdered sugar. This prevents sticking when you roll the cake.
- Transfer to Towel: Place a clean kitchen towel over the top of the cake, then carefully flip the baking tray to transfer the cake onto the towel. The powdered sugar should now be on the bottom.
2. Remove Parchment Paper:
- Peel Gently: Carefully peel off the parchment paper from the back of the cake. If the cake sticks, use a knife to gently loosen it.
3. Initial Roll:
- Roll with Towel: Starting from one of the short ends, roll the cake up tightly with the towel still in place. This initial roll, while the cake is still warm, helps it form the desired shape and prevents cracking later.
- Cooling: Allow the rolled cake to cool completely while wrapped in the towel. This helps the cake retain its shape and become more pliable for filling.
4. Unroll and Fill:
- Careful Unrolling: Once the cake has cooled, gently unroll it. Don’t worry if it doesn’t lie completely flat; slight curves are normal.
- Spread Filling: Spread your prepared filling evenly over the entire surface of the cake. Whether you’re using whipped cream, chocolate ganache, or any other filling, ensure it’s spread smoothly and evenly.
5. Final Roll:
- Rerolling: Starting again from the same short end, carefully roll the cake back up, this time without the towel. Use the towel to help guide and tighten the roll if necessary.
- Seam Side Down: Place the rolled cake seam side down on a serving platter to keep it from unrolling.
6. Finishing Touches:
- Decoration: Dust the top with powdered sugar, cocoa powder, or drizzle with chocolate ganache for an added touch of elegance.
- Chilling (Optional): If your filling is quite soft, you may want to chill the rolled cake for 30 minutes to an hour before slicing. This will help it hold its shape better when cut.
Variations and Serving Suggestions
Different Filling Options
One of the joys of making a Chocolate Swiss Roll is the flexibility to get creative with the filling. Here are some delicious and diverse options to elevate your Swiss roll and cater to various tastes:
1. Whipped Cream Filling:
- Basic Whipped Cream: Use 1 cup (240ml) of cold heavy cream, 2 tablespoons of powdered sugar, and 1 teaspoon of vanilla extract. Whip until stiff peaks form. This light and airy filling complements the rich chocolate sponge perfectly.
- Chocolate Whipped Cream: For a chocolatey twist, add 2 tablespoons of sifted cocoa powder to the whipped cream mixture before whipping.
- Flavored Whipped Cream: Experiment with different extracts like almond, peppermint, or orange to add unique flavors to your whipped cream.
2. Ganache Filling:
- Basic Chocolate Ganache: Combine equal parts of chopped high-quality chocolate and warm heavy cream. Stir until smooth and let it cool to a spreadable consistency. This rich and decadent filling adds a luxurious touch to your Swiss roll.
- Flavored Ganache: Infuse the ganache with different flavors by adding a splash of liqueur, like Grand Marnier or Baileys, or by incorporating spices such as cinnamon or chili powder.
3. Fruit Preserves and Jam:
- Berry Preserves: Spread a thin layer of raspberry, strawberry, or blueberry preserves over the cake before adding whipped cream or ganache. The tartness of the berries balances the sweetness of the cake.
- Citrus Marmalade: For a zesty twist, use orange or lemon marmalade as a filling. The bright citrus flavors pair wonderfully with the chocolate sponge.
- Homemade Jam: If you have homemade jam, this can add a personal touch to your Swiss roll. Ensure it’s spread evenly for the best results.
4. Buttercream Filling:
- Vanilla Buttercream: Beat together 1 cup (230g) of unsalted butter, 3-4 cups (360-480g) of powdered sugar, 2-3 tablespoons of milk or heavy cream, and 1 teaspoon of vanilla extract until smooth and creamy. This rich and sweet filling contrasts nicely with the chocolate cake.
- Chocolate Buttercream: Add 1/4 cup (25g) of sifted cocoa powder to the basic buttercream recipe for a chocolatey version.
- Flavored Buttercream: Try adding flavors like coffee, caramel, or even a hint of mint to the buttercream for a unique taste.
5. Cream Cheese Filling:
- Basic Cream Cheese Filling: Beat together 8 oz (225g) of cream cheese, 1/2 cup (115g) of unsalted butter, 2 cups (240g) of powdered sugar, and 1 teaspoon of vanilla extract until smooth. This tangy and creamy filling adds a delightful contrast to the chocolate sponge.
- Flavored Cream Cheese: Mix in fruit purees, such as strawberry or mango, for a fruity twist on the classic cream cheese filling.
6. Custard or Pastry Cream:
- Vanilla Custard: Prepare a classic vanilla custard or pastry cream for a smooth and luscious filling. The custard’s silky texture complements the airy sponge.
- Chocolate Custard: Add melted chocolate to the custard mixture for an indulgent chocolate filling.
Presentation Ideas
The presentation of your Chocolate Swiss Roll can elevate it from a simple dessert to an impressive showstopper. Here are some creative and elegant ideas to make your Swiss roll look as good as it tastes:
1. Classic Dusting:
- Powdered Sugar: A light dusting of powdered sugar over the top of the Swiss roll adds a touch of elegance and a hint of sweetness.
- Cocoa Powder: For a chocolatey finish, dust the roll with cocoa powder or a mixture of powdered sugar and cocoa.
2. Chocolate Ganache Drizzle:
- Ganache: Drizzle the Swiss roll with a rich chocolate ganache for a glossy, luxurious look. You can create a zigzag pattern or let the ganache cascade down the sides.
- Double Drizzle: For a contrasting effect, drizzle both dark and white chocolate ganache over the top.
3. Whipped Cream Accents:
- Piped Whipped Cream: Use a piping bag with a star tip to pipe rosettes or swirls of whipped cream along the top of the roll.
- Fresh Berries: Add fresh raspberries, strawberries, or blueberries to the whipped cream rosettes for a pop of color and a fresh taste.
4. Fruit and Nut Garnish:
- Fresh Fruits: Garnish the Swiss roll with slices of fresh fruit like strawberries, kiwi, or mandarin oranges. Arrange them in a decorative pattern along the top.
- Chopped Nuts: Sprinkle chopped nuts like almonds, hazelnuts, or pistachios over the top for added texture and visual appeal.
5. Edible Flowers:
- Decorative Flowers: Use edible flowers like violets, pansies, or nasturtiums to adorn the top of the Swiss roll. They add a beautiful and delicate touch.
- Petal Scattering: Scatter flower petals around the serving platter for an extra touch of elegance.
6. Slicing Presentation:
- Clean Slices: Use a serrated knife to cut clean, even slices. Wipe the knife blade between cuts to ensure neat edges.
- Angle Cuts: For a more sophisticated look, cut the Swiss roll at a slight angle and arrange the slices in a fanned-out pattern on the serving platter.
7. Festive Decorations:
- Holiday Themes: Decorate the Swiss roll according to the season or occasion. For example, add green and red sprinkles for Christmas, or pastel-colored candies for Easter.
- Custom Messages: Use melted chocolate or icing to write personalized messages or designs on the roll.
8. Serving Ideas:
- Platter Presentation: Arrange the Swiss roll on a decorative serving platter with a dusting of powdered sugar around the edges.
- Accompaniments: Serve the Swiss roll with a side of fresh fruit, a dollop of whipped cream, or a scoop of vanilla ice cream for an extra treat.
Storing and Keeping the Swiss Roll Fresh
Proper storage is key to maintaining the texture and flavor of your Chocolate Swiss Roll. Here are some detailed guidelines to ensure your Swiss roll stays fresh and delicious:
1. Immediate Storage:
- Cooling: Allow the Swiss roll to cool completely before storing it. This prevents condensation and keeps the cake from becoming soggy.
- Initial Wrapping: Once the Swiss roll is cooled, wrap it tightly in plastic wrap. This helps maintain moisture and prevent the cake from drying out.
2. Refrigeration:
- Short-Term Storage: If you plan to enjoy the Swiss roll within a few days, store it in the refrigerator. Place the wrapped roll in an airtight container to further protect it from absorbing any fridge odors.
- Ideal Temperature: Keep the Swiss roll in the coldest part of the refrigerator, but away from the back where it might freeze. The optimal temperature is around 37-40°F (3-4°C).
3. Freezing:
- Long-Term Storage: For longer storage, you can freeze the Swiss roll. Wrap the cooled roll in a double layer of plastic wrap, followed by a layer of aluminum foil. This extra protection helps prevent freezer burn.
- Portioning: Consider slicing the Swiss roll into individual portions before freezing. This makes it easier to thaw just the amount you need without defrosting the entire roll.
4. Thawing:
- Refrigerator Thawing: To thaw the Swiss roll, transfer it from the freezer to the refrigerator and let it thaw overnight. This gradual thawing helps maintain the cake’s texture.
- Room Temperature: Once thawed, you can bring the Swiss roll to room temperature before serving. This enhances the flavors and makes the cake softer.
5. Serving:
- Final Touch: Before serving, you may want to dust the Swiss roll with a bit more powdered sugar or cocoa powder to freshen up its appearance.
- Slice with Care: Use a serrated knife to slice the Swiss roll cleanly. Wipe the knife blade between slices for neat, even cuts.
6. Shelf Life:
- Refrigerated: When stored in the refrigerator, the Swiss roll should stay fresh for up to 3-5 days.
- Frozen: If frozen, the Swiss roll can be kept for up to 2-3 months. Beyond this period, the quality may start to decline, though it will still be safe to eat.
7. Tips for Freshness:
- Moisture Maintenance: Avoid exposing the Swiss roll to air by ensuring it is always wrapped tightly when not being served. Air exposure can lead to dryness.
- Flavor Preservation: Store the Swiss roll away from strong-smelling foods in the refrigerator or freezer to prevent it from absorbing unwanted odors.
Final Thoughts
Summary of the recipe process
Creating a delicious Chocolate Swiss Roll is a rewarding experience that combines several essential steps. Here’s a comprehensive summary of the process, broken down into manageable stages:
1. Preparing the Batter:
- Preheat the Oven: Start by preheating your oven to 350°F (175°C) and line a 10×15 inch baking tray with parchment paper.
- Separate the Eggs: Separate 4 large eggs into whites and yolks.
- Whip the Egg Whites: Beat the egg whites with half of the sugar until stiff peaks form.
- Mix the Egg Yolks: Beat the yolks with the remaining sugar until thick and creamy, then add vanilla extract.
- Combine Dry Ingredients: Sift together flour, cocoa powder, baking powder, and salt, and fold them into the yolk mixture.
- Incorporate Egg Whites: Gently fold the whipped egg whites into the batter in three additions to maintain a light texture.
Encouragement to Try the Recipe
If you’ve ever found yourself intimidated by the idea of baking a Swiss roll, let this be your sign to dive in and give it a try! Baking a Chocolate Swiss Roll is a delightful and rewarding experience that brings joy not only to your taste buds but also to everyone you share it with. Here are some reasons why you should definitely try this recipe:
1. Simple and Fun Process:
- Step-by-Step Guidance: This recipe breaks down the process into easy-to-follow steps, making it accessible even for novice bakers. Each stage is explained in detail, so you can bake with confidence.
- Enjoyable Baking: Rolling a cake and creating that perfect spiral is a fun and satisfying experience. Watching your creation come together is immensely rewarding.
2. Delicious and Impressive Results:
- Rich Chocolate Flavor: The combination of a light, fluffy chocolate sponge with a creamy filling is simply irresistible. Your taste buds will thank you!
- Elegant Presentation: The Swiss roll’s elegant spiral design makes it a showstopper at any gathering. It looks like a dessert you’d find in a fancy bakery, but you made it yourself!
3. Versatility and Customization:
- Endless Variations: You can experiment with different fillings and decorations to suit your preferences. Whether you prefer whipped cream, ganache, or fruit preserves, the possibilities are endless.