
Table of Contents
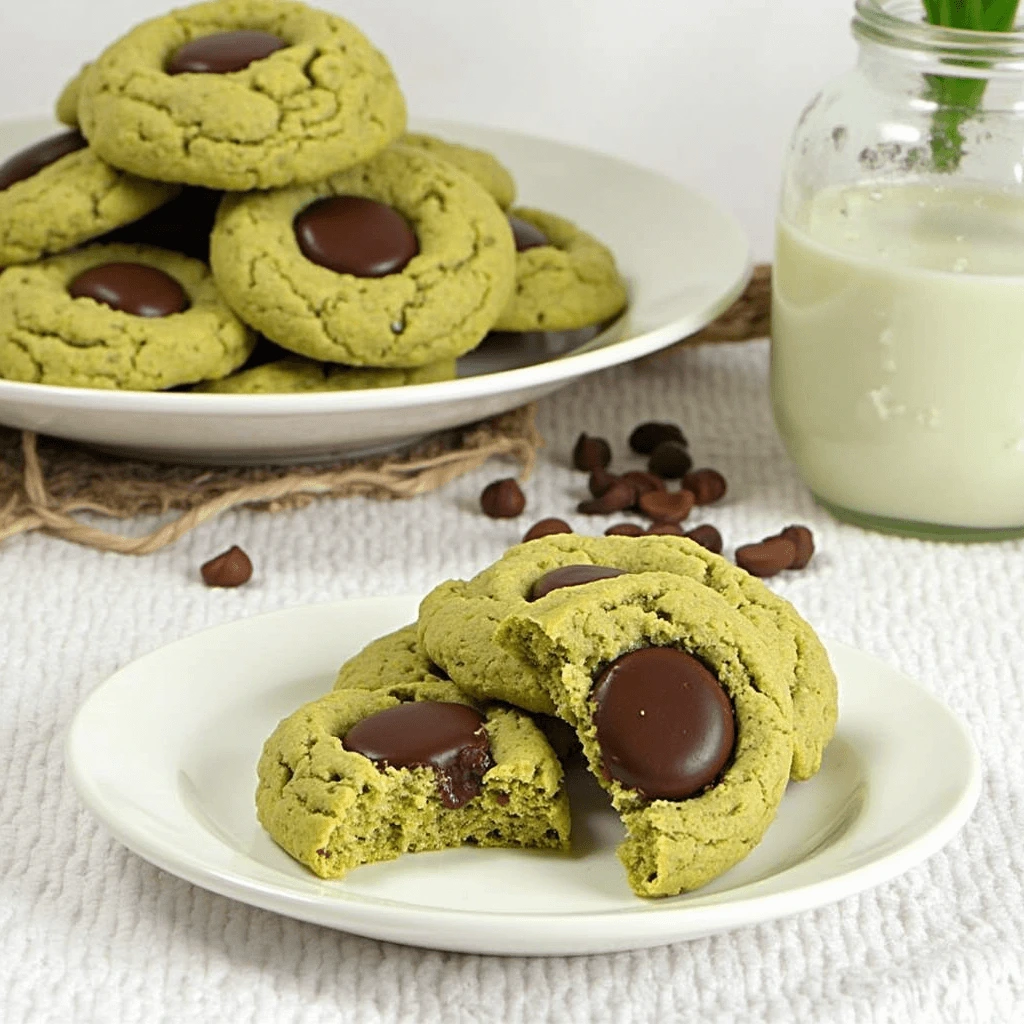
Matcha Chocolate Thumbprint Cookies are a delightful fusion of earthy green tea flavors and rich, velvety chocolate, making them an irresistible treat for dessert lovers. These cookies not only stand out with their vibrant green hue but also offer a perfect balance of sweetness, slight bitterness, and creamy indulgence.
Baking these cookies might seem simple, but achieving the ideal texture, deep matcha flavor, and smooth chocolate filling requires attention to detail. From choosing high-quality matcha powder to mastering the thumbprint technique, every step plays a crucial role in making these cookies turn out just right.
In this guide, we’ll share the top 10 expert tips to help you bake the perfect Matcha Chocolate Thumbprint Cookies every time. Whether you’re a baking enthusiast or a beginner, these tips will ensure your cookies are soft, flavorful, and visually stunning.
Choosing the Right Matcha for the Best Flavo

Ceremonial vs. Culinary Grade Matcha – Which One to Use?
When baking Matcha Chocolate Thumbprint Cookies, the type of matcha powder you use can significantly impact the flavor, color, and overall quality of your cookies. Matcha is available in two primary grades: ceremonial-grade matcha and culinary-grade matcha. Understanding their differences will help you make the best choice for baking.
1. What is Ceremonial-Grade Matcha?
Ceremonial-grade matcha is the highest quality matcha, made from the youngest, most delicate tea leaves. It is traditionally used for drinking in tea ceremonies and is known for its:
Vibrant green color due to high chlorophyll content
Smooth, naturally sweet taste with umami richness
Finely ground, silky texture that dissolves easily in water
While this premium matcha is excellent for beverages, it is not always necessary for baking because its delicate flavors can be overpowered by other ingredients, such as sugar and chocolate.
2. What is Culinary-Grade Matcha?
Culinary-grade matcha is specifically designed for cooking and baking. It comes from slightly older tea leaves, giving it:
A stronger, more robust flavor with mild bitterness
A slightly darker green or yellowish-green hue
A coarser texture compared to ceremonial matcha
Since it has a bolder taste, culinary-grade matcha holds up well when combined with sugar, butter, and chocolate, making it the best choice for baking Matcha Chocolate Thumbprint Cookies.
3. Which Matcha Should You Use for Baking?
For baking purposes, culinary-grade matcha is the recommended choice because:
It provides a stronger matcha flavor that doesn’t get lost in the sweetness.
It is more affordable than ceremonial-grade matcha.
It retains its green color even after baking at high temperatures.
If you want a more vibrant green color and milder, smoother taste, you can mix a small amount of ceremonial-grade matcha into your cookie dough. However, for most recipes, high-quality culinary-grade matcha works best.
4. Recommended Brands for Baking Matcha Cookies
When selecting matcha, choose brands known for their freshness and rich color. Here are some great options:
Jade Leaf Culinary Matcha
AIYA Cooking Grade Matcha
Matcha Love Culinary Powder
Ippodo Tea Ummon Ceremonial (for premium results)
How Freshness Affects the Taste and Color of Your Cookies
The freshness of your ingredients plays a critical role in determining the flavor, texture, and appearance of your cookies. Whether you’re baking classic chocolate chip cookies or delicate shortbread, using fresh ingredients ensures the best results.
1. Impact on Taste
Fresh ingredients enhance the depth and richness of your cookies, while stale or expired ingredients can lead to bland, bitter, or even off-putting flavors. Here’s how freshness affects taste:
- Butter: Fresh butter provides a creamy, rich taste, whereas old butter can become rancid, giving cookies an unpleasant aftertaste.
- Eggs: Fresh eggs add structure and moisture, while older eggs can introduce a sulfuric or stale flavor.
- Flour: While flour has a long shelf life, stale flour can develop a musty or cardboard-like taste.
- Sugar & Brown Sugar: Fresh sugar caramelizes properly, contributing to a balanced sweetness, while hardened brown sugar affects both taste and texture.
2. Impact on Color
The color of your cookies is influenced by ingredient freshness and chemical reactions during baking. Key factors include:
- Leavening Agents (Baking Powder & Baking Soda): Fresh leavening agents create a proper rise and golden-brown hue, while expired ones cause pale, flat cookies.
- Cocoa Powder: Fresh cocoa powder gives chocolate cookies a rich, deep brown color, whereas older cocoa may result in dull, faded tones.
- Butter & Dairy: Fresh butter and milk help create even browning, while spoiled dairy can cause uneven coloration.
3. The Science Behind Freshness & Baking
Fresh ingredients interact differently under heat, affecting the Maillard reaction and caramelization process, both of which contribute to the golden-brown color and rich flavors in cookies. Old ingredients may not undergo these reactions properly, leading to underwhelming results.
Best Matcha Brands for Baking: Top Picks for Vibrant Color and Flavor
When baking with matcha, selecting the right culinary-grade matcha ensures the best results in terms of flavor, color, and texture. Unlike ceremonial-grade matcha, which is best for drinking, culinary-grade matcha is specifically processed to hold up well in recipes while maintaining its signature green tea flavor.
What Makes a Great Matcha for Baking?
To get the best results in cookies, cakes, lattes, and other desserts, look for these key characteristics in matcha:
- Vibrant Green Color: A deep, bright green hue indicates freshness and high quality. Dull or brownish-green matcha may be old or lower quality.
- Rich, Bold Flavor: Culinary matcha has a slightly stronger and more astringent taste than ceremonial matcha, making it ideal for baking, as the flavor won’t get lost among other ingredients.
- Fine Powder Texture: Smooth, finely ground matcha blends well into batters and doughs without clumping.
- Sourced from Japan: High-quality matcha is typically grown in Uji, Kyoto, or Nishio, Japan, where traditional cultivation methods ensure superior taste and aroma.
Top Matcha Brands for Baking
1. Jade Leaf Culinary Matcha
- One of the most popular choices for baking
- Affordable yet high-quality, sourced from Japan
- Smooth and bold, great for matcha cookies, cakes, and frostings
2. MatchaBar Culinary Matcha
- A well-balanced flavor with mild bitterness
- Ideal for recipes that require a stronger matcha taste, such as lattes and cheesecakes
- Finely milled for easy mixing
3. Aiya Matcha Culinary Grade
- Premium Japanese matcha known for its rich umami flavor
- Bright green color that stays vibrant in baked goods
- Excellent for matcha brownies, cupcakes, and muffins
4. Encha Culinary Organic Matcha
- USDA-certified organic, sourced from Uji, Japan
- Slightly sweeter and smoother than other culinary-grade options
- Works well in both desserts and beverages
5. Kyoto Dew Matcha – Culinary Grade
- Strong, bold taste that holds up well in recipes
- High-quality, authentic Japanese matcha
- Fine powder consistency for easy incorporation into batters
Tips for Using Matcha in Baking
- Use the right amount: Typically, 1–2 teaspoons of matcha per cup of flour is recommended for a noticeable flavor and color.
- Sift before mixing: This helps prevent clumping and ensures an even distribution in your batter or dough.
- Store properly: Keep matcha in an airtight container away from light and heat to maintain freshness and color.
Perfecting Your Cookie Dough for the Ideal Texture
Balancing Dry and Wet Ingredients for Soft Cookies: The Key to Perfect Texture
One of the most important aspects of baking soft, chewy cookies is achieving the right balance between dry and wet ingredients. If your cookies turn out too dry and crumbly or overly soft and greasy, it’s likely due to an imbalance in these ingredients. Understanding how they work together will help you bake cookies with perfect texture, moisture, and structure every time.
1. The Role of Dry and Wet Ingredients in Cookie Dough
Each ingredient in a cookie recipe serves a specific purpose, and adjusting them even slightly can change the final result. Here’s how dry and wet ingredients contribute to texture:
Dry Ingredients (Structure & Stability)
- Flour – The main dry ingredient that provides structure. More flour makes cookies firmer, while less makes them softer.
- Baking Powder & Baking Soda – Help cookies rise and spread properly. Using too much or too little affects texture and density.
- Cocoa Powder (for chocolate cookies) – Adds flavor but can dry out cookies if not balanced with enough moisture.
- Salt – Enhances flavor and balances sweetness but does not affect texture much.
Wet Ingredients (Moisture & Binding)
- Butter – Adds richness and softness. Melted butter creates chewy cookies, while creamed butter makes them fluffier.
- Eggs – Bind ingredients together and add moisture, contributing to softness. More eggs = softer cookies.
- Milk / Cream – Provides extra moisture when needed.
- Liquid Sweeteners (Honey, Maple Syrup, Molasses) – Not only sweeten but also retain moisture, making cookies softer.
- Vanilla Extract – Adds flavor without affecting texture much.
2. What Happens When the Balance Is Off?
If your cookie dough has too much or too little of either dry or wet ingredients, it will affect the final texture. Here’s how:
- Too much dry ingredients (flour, cocoa powder, baking powder) → Dry, crumbly, tough cookies that lack chewiness.
- Too much wet ingredients (butter, eggs, milk, honey) → Cookies spread too much, become greasy, or turn out overly soft and underbaked.
3. Tips to Achieve the Perfect Balance
- Measure flour correctly – Use the spoon-and-level method instead of scooping directly from the bag to prevent excess flour.
- Cream butter and sugar properly – Over-creaming can introduce too much air, making cookies cakier rather than chewy.
- Adjust as needed – If the dough feels too dry, add a tablespoon of milk. If it’s too wet, add a bit more flour.
- Chill the dough before baking – This helps control spread and retains moisture for a softer texture.
4. Special Ingredients to Keep Cookies Soft
Adding certain ingredients can help maintain softness:
- Cornstarch – Just 1 teaspoon makes cookies extra tender.
- Brown Sugar – Retains moisture better than white sugar, leading to a chewier texture.
- Greek Yogurt or Sour Cream – Just a tablespoon can add extra softness.
- Egg Yolks Instead of Whole Eggs – More fat from yolks makes cookies richer and chewier
Why Chilling the Dough is Crucial for Perfect Cookies
Chilling cookie dough before baking is a simple yet essential step that can significantly improve the texture, flavor, and appearance of your cookies. While it may be tempting to bake the dough right away, taking the extra time to chill it can make all the difference. Here’s why:
1. Improves Texture and Structure
- When dough is chilled, the fat (usually butter) solidifies, preventing cookies from spreading too much during baking. This results in thicker, chewier cookies rather than flat, thin ones.
- Chilled dough allows the flour to better absorb the wet ingredients, creating a more uniform and stable structure.
2. Enhances Flavor Development
- Letting the dough rest in the fridge gives the ingredients time to meld together, intensifying the overall flavor.
- The starches in the flour break down slightly, leading to a more complex, caramelized taste when baked.
3. Helps Achieve Even Browning
- Cold dough bakes more evenly, reducing the risk of cookies over-browning on the edges while staying raw in the center.
- Sugar absorbs moisture more effectively, contributing to a perfectly golden color.
4. Prevents Sticky Dough and Improves Handling
- Chilled dough is easier to shape and scoop, especially when working with sticky or soft doughs like chocolate chip or sugar cookies.
- If rolling out dough for cut-out cookies, chilling prevents it from sticking to the rolling pin and helps cookies hold their shape.
How Long Should You Chill Cookie Dough?
- 30 minutes to 1 hour – Helps firm up the dough for easier handling.
- 2-4 hours – Enhances flavor and texture noticeably.
- Overnight (or up to 72 hours) – The best for deep, rich flavors and perfectly chewy cookies.
Pro Tip: Quick-Chill Method
Short on time? Flatten the dough into a disc or scoop it into balls and place it in the freezer for 15-30 minutes to speed up the chilling process.
Avoiding Overmixing to Prevent Tough Cookies
One of the most common mistakes in cookie baking is overmixing the dough. While it might seem like mixing thoroughly will yield better results, overworking the dough can lead to dense, tough, and dry cookies instead of the soft, chewy treats you’re aiming for. Here’s why overmixing happens and how to prevent it.
1. Why Overmixing Makes Cookies Tough
Overmixing primarily affects the gluten development in the dough. Here’s how:
- Flour contains gluten, which gives baked goods structure.
- When flour is mixed with wet ingredients, gluten strands begin to form.
- Too much mixing = too much gluten development, resulting in tough, rubbery cookies instead of tender, delicate ones.
- Overmixing also incorporates excess air, which can lead to cookies that rise too much and then collapse, making them dense.
2. How to Mix Cookie Dough Properly
To avoid overmixing, follow these best practices:
- Cream butter and sugar just until fluffy – Overmixing at this stage can introduce too much air, leading to a cakier texture.
- Mix dry ingredients separately first – This ensures even distribution before combining with wet ingredients.
- Use a gentle folding motion – When adding flour, mix just until the ingredients are incorporated. Stop as soon as you don’t see streaks of flour.
- Mix by hand for better control – Using a wooden spoon or spatula instead of an electric mixer reduces the risk of overworking the dough.
3. Signs You’ve Overmixed Your Dough
- The dough feels sticky and elastic rather than soft and pliable.
- The baked cookies turn out tough, dry, or overly dense.
- Cookies spread less than expected and have a hard texture.
4. Pro Tip: The “Final Stir” Method
Once the dry ingredients are nearly mixed in, stop using the mixer and finish stirring by hand. This prevents overworking the dough while ensuring all ingredients are fully combined.
Filling Your Thumbprint Cookies with the Perfect Chocolate Ganache
Making a Simple Chocolate Ganache
Making a smooth and creamy chocolate ganache is an essential skill for filling your matcha chocolate thumbprint cookies. The process is simple, but the result can elevate the flavor and presentation of your cookies.
1. Ingredients You’ll Need
- Chocolate: You can use either dark, milk, or white chocolate depending on your flavor preference. Dark chocolate provides a rich, slightly bitter taste that pairs beautifully with the earthy matcha, while milk chocolate offers a sweeter, creamier filling.
- Heavy Cream: This is the key ingredient that creates the smooth, glossy texture. It helps to thin the chocolate to the right consistency for filling your thumbprints.
- Optional Add-ins: To add extra flavor, consider incorporating vanilla extract, a pinch of salt, or even a bit of liqueur (like Grand Marnier) to the ganache for a unique twist.
2. How to Make the Ganache

- Step 1: Chop the Chocolate: Begin by chopping your chocolate into small, uniform pieces. This ensures it melts evenly and quickly when combined with the cream.
- Step 2: Heat the Cream: In a small saucepan, heat the heavy cream over medium heat until it just begins to simmer (don’t let it boil). You’ll start to see small bubbles forming around the edges.
- Step 3: Combine the Chocolate and Cream: Pour the hot cream over the chopped chocolate in a heatproof bowl. Let it sit for a minute to allow the cream to soften the chocolate, then gently stir with a spatula or whisk until the mixture is smooth and glossy.
- Step 4: Cool to Desired Consistency: Allow the ganache to cool slightly to thicken it up to the perfect consistency for your thumbprint cookies. If you want it thicker, let it sit for a bit longer; if it’s too thick, you can stir in a bit more warm cream.
3. Tips for Perfect Ganache
- Consistency Matters: For thumbprint cookies, you want the ganache to be thick enough to stay in the thumbprint but not so thick that it won’t spread easily. If it’s too runny, let it cool further, and if it’s too thick, you can reheat it gently with a bit of cream.
- Smooth Finish: For a perfectly smooth finish, make sure to stir the ganache thoroughly. Any lumps will affect the final look and texture of your cookie filling.
- Flavor Variations: Add a small splash of vanilla extract for a deeper flavor, or experiment with infusing the cream with spices like cinnamon or chili powder for a unique twist.
4. Using the Ganache for Thumbprints
Once your ganache has reached the perfect texture, you can easily spoon or pipe it into the thumbprint indentations in your matcha cookies. Let the ganache set as the cookies cool to ensure the filling holds its shape.
Chocolate Choices
Choosing the right chocolate for your ganache is a key element in perfecting your matcha chocolate thumbprint cookies. The type of chocolate you select will not only influence the taste of the filling but also its texture and appearance. Here’s a guide to help you pick the best chocolate for your cookies.
1. Dark Chocolate
- Flavor Profile: Dark chocolate offers a rich, slightly bitter taste with deep cocoa flavor, making it the ideal match for the earthy, slightly grassy flavor of matcha. It creates a sophisticated and balanced contrast to the sweetness of the cookies.
- Best Use: Dark chocolate is the go-to choice for those who prefer a more robust, less sugary filling. It pairs perfectly with matcha’s subtle bitterness, enhancing the overall flavor profile.
- Cocoa Percentage: Choose dark chocolate with at least 60% cocoa content for a good balance between bitterness and sweetness. Higher percentages (70% or more) will result in a more intense chocolate flavor.
2. Milk Chocolate
- Flavor Profile: Milk chocolate is sweeter, creamier, and milder than dark chocolate. It has a smooth, velvety texture and a more sugary taste, which can be a great contrast against the earthiness of matcha, especially if you prefer a sweeter dessert.
- Best Use: Milk chocolate is perfect if you’re looking for a more indulgent, dessert-like filling. It’s especially great for those who enjoy a sweeter, less intense chocolate experience.
- Sweetness: If you opt for milk chocolate, be mindful of the overall sweetness of your cookies. You may want to adjust the amount of sugar in the cookie dough to balance the flavor.
3. White Chocolate
- Flavor Profile: White chocolate is the sweetest and creamiest of all the chocolate types, with a smooth, buttery taste. It lacks cocoa solids, so it doesn’t have the same richness or complexity as dark or milk chocolate. However, its sweetness can work well with the slightly bitter flavor of matcha.
- Best Use: White chocolate ganache adds a decadent, creamy filling and is a great choice if you’re looking for a lighter, more delicate flavor profile in your thumbprint cookies. It pairs beautifully with matcha, creating a visually appealing contrast with the green color.
- Considerations: Since white chocolate is very sweet, it’s important to monitor the sweetness level in your cookie dough to prevent it from becoming overly sugary.
4. Chocolate Mixtures
- Combining Chocolates: If you can’t decide between dark, milk, or white chocolate, consider blending two types of chocolate together. For example, a 70% dark chocolate with a bit of milk chocolate can create a balanced ganache that has both depth and sweetness.
- Flavor Enhancements: You can also experiment with adding a touch of flavored chocolate, such as hazelnut or orange-infused chocolate, to give your ganache a unique twist. These variations can add an extra layer of flavor that complements the matcha.
5. Choosing High-Quality Chocolate
- Why Quality Matters: For the best results, always choose high-quality chocolate, especially when making ganache. Look for chocolate with few added ingredients, free from artificial flavors or preservatives. High-quality chocolate will melt more smoothly and provide a more luxurious texture and taste for your filling.
- Recommended Brands: Consider using reputable brands like Lindt, Valrhona, Ghirardelli, or Callebaut for top-notch chocolate that will elevate the flavor of your cookies.
How to Fill the Thumbprint
Filling the thumbprint cookies with ganache or jam is one of the most fun and satisfying parts of baking. It’s important to make sure the filling looks appealing and stays in place without spilling over during baking. Here’s a step-by-step guide on how to perfectly fill your matcha chocolate thumbprint cookies:
1. Preparing the Cookie Dough
- Chill the Dough: After you’ve made your matcha thumbprint cookie dough, make sure to chill it for at least 30 minutes before shaping. This helps the dough firm up, making it easier to form into balls and shape without sticking.
- Roll into Balls: Roll the chilled dough into uniform balls (about 1-inch in diameter) using your hands. Try to make them as even in size as possible to ensure consistent baking.
2. Creating the Thumbprint
- Use Your Thumb (or a Spoon): To create the classic thumbprint shape, gently press your thumb into the center of each dough ball. Be careful not to press all the way through; you want to form a deep enough indentation to hold the ganache, but not a hole that goes all the way through the cookie.
- Alternative Tools: If you prefer, you can use the back of a spoon or a small measuring spoon to press into the dough. This method can give you a more uniform indentation, especially if you’re looking for a rounder, more polished look.
3. Filling the Thumbprint
- Using Ganache: Once you’ve prepared your chocolate ganache (as described earlier), it’s time to fill the thumbprint. For a clean, controlled approach, you can use one of the following methods:
- Spoon Method: Use a small spoon to carefully scoop up the ganache and drop it into the indentation. Start with a small amount and add more if needed. The ganache should fill the indentation just above the surface of the cookie but not overflow.
- Piping Method: If you want a more precise, mess-free filling, transfer the ganache into a piping bag or a plastic zip-top bag with the tip cut off. Pipe the ganache into the center of each thumbprint, filling them evenly. This method works well if you want to create a clean, neat finish.
- Using Jam or Other Fillings: If you prefer to use a fruit jam or another filling, spoon a small amount (about half a teaspoon) into each thumbprint. Be careful not to overfill, as it can spill over during baking.
4. Tips for Perfectly Filled Thumbprints
- Don’t Overfill: While it’s tempting to load up on filling, avoid overfilling the thumbprint. Too much ganache or jam can bubble over as the cookies bake, creating a mess and affecting the texture of the cookie.
- Smooth the Ganache: If your ganache settles unevenly in the thumbprint, use the back of a spoon to gently smooth the surface for a neat and polished appearance.
- Stay Consistent: Try to fill each thumbprint with the same amount of ganache to ensure even baking and presentation. Using a piping bag helps maintain consistency.
5. Final Touch
- Let the Ganache Set: After baking, the ganache filling will continue to set as the cookies cool, so be sure to allow your cookies to rest at room temperature for a few minutes before serving.
- Optional Garnish: If desired, add a decorative touch by sprinkling the ganache with matcha powder, crushed nuts, or even a light dusting of powdered sugar to enhance the look and flavor of your cookies.
Baking Tips for Perfectly Crisp and Chewy Matcha Cookies

Baking Temperature and Time
Getting the baking temperature and time just right is crucial for achieving the perfect texture and flavor in your matcha chocolate thumbprint cookies. Overbaking can make your cookies dry or too crispy, while underbaking can leave them soft and doughy. Here’s a detailed guide on how to achieve perfectly baked thumbprint cookies every time:
1. Ideal Baking Temperature
- Preheat the Oven: Always preheat your oven to the correct temperature before baking. For matcha chocolate thumbprint cookies, a temperature of 350°F (175°C) is ideal for achieving a golden-brown exterior and a soft, chewy interior.
- Oven Variability: Keep in mind that ovens can vary in temperature, so it’s a good idea to use an oven thermometer to ensure your oven is accurate. Some ovens may run hotter or cooler than the dial suggests, which can affect baking times.
2. Baking Time
- Standard Baking Time: Bake your cookies for 8-12 minutes. The exact time will depend on your oven and the size of the cookies. Start checking around the 8-minute mark.
- Smaller Cookies: If you’ve made smaller-sized dough balls (about 1 inch), they may bake in 8-9 minutes.
- Larger Cookies: If your dough balls are slightly bigger, the baking time may extend to 10-12 minutes.
- When Are They Done?:
- The cookies should be lightly golden around the edges, but the center should still look a little soft. The thumbprint indentation will maintain its shape and may slightly puff up when baking.
- The ganache or jam filling may bubble slightly, but it should remain in the thumbprint without spilling over.
3. Tips for Even Baking
- Use Parchment Paper: Line your baking sheet with parchment paper or a silicone baking mat. This will help ensure even heat distribution and prevent the cookies from sticking.
- Space the Cookies Properly: Arrange the cookies with enough space between them (about 2 inches apart) to allow for even air circulation. This helps them bake uniformly.
- Rotate the Baking Sheet: If your oven has hot spots, consider rotating the baking sheet halfway through baking. This ensures that the cookies bake evenly on all sides, especially if your oven tends to heat unevenly.
4. Don’t Overbake!
- Watch Carefully: It’s easy to overbake thumbprint cookies, as the edges can brown quickly. Keep an eye on them in the final few minutes to ensure they don’t get too crispy.
- Residual Heat: Remember that the cookies will continue to cook slightly as they cool on the baking sheet due to residual heat, so it’s better to slightly underbake them than to overbake them.
5. Cooling the Cookies
- Cooling on the Baking Sheet: Allow the cookies to cool on the baking sheet for 5-10 minutes before transferring them to a wire rack. This helps them set and prevents the ganache from being disturbed.
- Full Cooling: Let the cookies cool completely before serving or storing, as this allows the ganache to firm up and keeps the cookies from becoming too soft.
Cookie Placement on the Baking Sheet
Proper placement of your thumbprint cookie dough on the baking sheet is crucial for even baking and ensuring that the cookies retain their shape during the baking process. Here’s a guide to help you achieve uniform, perfectly baked matcha chocolate thumbprint cookies:
1. Use Parchment Paper or Silicone Baking Mat
- Parchment Paper: Line your baking sheet with parchment paper to prevent sticking and ensure easy removal of the cookies once baked. Parchment paper also helps with even heat distribution, leading to uniform baking.
- Silicone Baking Mat: If you have one, a silicone baking mat is a great reusable option that provides a non-stick surface and further ensures even baking.
Both options will help prevent your cookies from spreading too much and ensure they bake evenly without sticking to the pan.
2. Space the Cookies Properly
- Allow Sufficient Space: Leave at least 2 inches of space between each cookie dough ball. Thumbprint cookies will spread slightly as they bake, and this space allows for that expansion without them merging together.
- Don’t Overcrowd: Placing too many cookies on the baking sheet can lead to uneven baking, as the heat won’t circulate well around each cookie. Giving them room to spread ensures they bake evenly and maintain their shape.
3. Uniform Cookie Size
- Use a Cookie Scoop: To ensure your cookies bake evenly, use a cookie scoop or spoon to portion out the dough. This helps achieve uniform dough ball sizes, so all your cookies bake in the same amount of time.
- Shape Evenly: If you’re rolling the dough by hand, make sure the dough balls are uniform in size and shape. Slightly uneven dough balls can lead to uneven baking, with some cookies overbaking while others are undercooked.
4. Placement of the Thumbprint Indentation
- Indentation Placement: When creating the thumbprint indentation, make sure it’s centered in each dough ball. This helps the ganache or jam fill evenly and prevents the filling from spilling out during baking. Press the center lightly with your thumb (or a spoon) to create a deep, round indentation.
- Depth of Indentation: The thumbprint should be deep enough to hold the ganache or jam, but don’t press too hard, as this can flatten the cookie too much, making it too thin and crunchy. A shallow indentation can also result in the filling spilling over during baking.
5. Batch Size and Oven Capacity
- Baking in Batches: If you’re making a large batch of cookies, bake them in two or more rounds to avoid overcrowding. Baking in smaller batches ensures that each cookie gets ample space to bake evenly and retain its shape.
- Top and Bottom Rack Positioning: If baking multiple trays at once, place the baking sheets in the center of the oven. If you’re using both the top and bottom racks, rotate the baking sheets halfway through the baking time to ensure even baking.
6. Preventing Over-Spreading
- Chill the Dough: If your dough starts to soften too much while shaping, refrigerate it for 10-15 minutes before placing it on the baking sheet. Chilled dough is less likely to spread excessively during baking, which helps maintain the shape of your thumbprint cookies.
Avoiding Overbaking
Overbaking is one of the most common mistakes when baking thumbprint cookies, and it can result in dry, crumbly cookies instead of the soft, chewy texture you want. Here are some tips to help you avoid overbaking your matcha chocolate thumbprint cookies and achieve the perfect texture:
1. Watch the Time Carefully
- Set a Timer: Baking times can vary slightly depending on the size of the cookies and the type of oven you’re using. Start checking your cookies at the lower end of the recommended baking time (around 8 minutes) to avoid overbaking. For matcha chocolate thumbprint cookies, this typically falls between 8-12 minutes.
- Check Early: It’s always better to check your cookies a minute or two earlier than the recipe suggests. Remember, the cookies will continue to bake on the sheet for a minute or two after you pull them out of the oven due to residual heat.
2. Look for Visual Cues
- Golden Edges: The best indication that your thumbprint cookies are done is when the edges begin to turn a light golden brown. This means the cookies have cooked through, but the centers should still be soft.
- Slight Firmness: Gently press the side of a cookie with your finger. If it’s soft but not doughy, it’s done. If it feels mushy or doughy in the center, it likely needs a bit more time, but be cautious about not letting it bake too long.
- Don’t Wait for Full Crispiness: Thumbprint cookies should remain slightly soft in the center. They will firm up as they cool on the baking sheet, so don’t wait for them to become completely crispy in the oven.
3. Watch the Filling
- Ganache or Jam Considerations: The filling in the thumbprint can be a good indicator of whether the cookies are done. The ganache should not bubble excessively, and if you are using jam, the edges should not scorch. If the ganache or jam starts to overflow, it could be a sign that the cookies are overbaking or too hot in the oven.
- Bubbling Filling: Some bubbling from the chocolate ganache or jam is normal, but if it’s excessively bubbling and spilling over, it could indicate that the temperature is too high. You may want to check your oven’s temperature accuracy.
4. Pay Attention to Cookie Thickness
- Cookie Size and Thickness: Thicker cookies will take a little longer to bake, while thinner cookies will bake faster. If your dough balls are slightly thicker, you may need to bake them for a minute or two longer, but be mindful of checking them frequently to avoid overbaking.
- Uniform Dough Balls: Ensuring that your cookie dough balls are uniform in size is crucial to prevent some cookies from being overbaked while others are underbaked.
5. Use the Right Baking Pan
- Light-Colored Pans: If you’re using dark-colored baking sheets, they can absorb more heat and cause your cookies to brown too quickly, leading to overbaking. Opt for light-colored pans or bakeware for more even heat distribution.
- Shallow Pans: Shallow baking pans allow heat to circulate more evenly around your cookies. Avoid using deep pans that might trap heat, causing your cookies to bake unevenly.
6. Cool on the Baking Sheet
- Resting Time: After pulling the cookies from the oven, let them rest on the baking sheet for 5-10 minutes. This helps the cookies set and prevents them from becoming too soft or breaking apart when you transfer them to a wire rack.
- Transfer Gently: When moving the cookies to a cooling rack, handle them gently to avoid disrupting the ganache or jam filling. The cookies will be delicate until they cool completely.
Conclusion
Baking matcha chocolate thumbprint cookies might seem like a delicate art, but with the right techniques and a bit of patience, you can create a beautiful batch that’s as delicious as it is visually stunning. Here’s a quick recap of the top 10 tips to make sure your cookies come out perfect every time:
- Choose High-Quality Ingredients: Use the best matcha powder and chocolate for rich, vibrant flavors that truly shine in your cookies.
- Sift Your Dry Ingredients: Sifting helps avoid clumps and ensures an even distribution of matcha powder and other dry ingredients.
- Cream the Butter and Sugar Properly: Beat your butter and sugar until light and fluffy to achieve a smooth dough and a tender, melt-in-your-mouth cookie texture.
- Chill the Dough: Refrigerate the dough before shaping to prevent spreading and help maintain the cookies’ shape.
- Space Your Cookies Evenly: Leave at least 2 inches between each cookie on the baking sheet to ensure even baking and prevent them from merging together.
- Create a Perfect Thumbprint: Press gently with your thumb or a spoon to create a deep, round indentation in the dough—this is where your ganache or jam will sit!
- Choose the Right Chocolate: Dark, milk, or white chocolate—select the one that complements your personal taste and balances the matcha’s flavor.
- Don’t Overfill the Thumbprint: Use a small spoon or piping bag to add the filling, ensuring it’s just the right amount to avoid spilling over during baking.
- Bake at the Right Temperature: Preheat your oven to 350°F (175°C), and bake for 8-12 minutes, watching carefully for golden edges and soft centers.
- Avoid Overbaking: Keep a close eye on your cookies, pulling them from the oven when the edges are golden and the centers remain soft. Allow them to cool on the baking sheet before transferring.